Monday, April 23, 2012

Projects from the Past: The Snape-ification of the Project of Doom

Since my crafting time will soon be abbreviated (helloooo, master's program), I will occasionally post Projects from the Past. I'll definitely try to keep up my blog with what I am currently crafting, but there are some finished projects I'd like to chronicle here as well.

I recently finished my Project of Doom. For anyone who might not know, this was a block-of-the-week Harry Potter-themed bookcase quilt from ofenjen at Fandom in Stitches. All the patterns are still available there, for free.

This 30-week project was an amazing journey. I made so many new friends and ended up with a piece of textile art that is so personal and precious to me. Part of the special nature of this project comes from the fact that it is very customisable. I chose book titles that would actually reside on my wizardy bookshelf, if I had one. I chose fabrics (almost entirely from my stash, a feat which I'm very proud of) that looked either worn or muted or just plain magical. Lastly, and what this post is mainly about, I modified some of Jennifer's blocks to cater to my fascination with Professor Snape.

Here is the finished quilt. I drafted the bookcase  pieces using my beloved french curves (passed down from my engineer grandfather). The bookcase pieces are fused and machine-appliqued. I chose the background floral because it reminded me of a William Morris-designed wallpaper.


Now on to some of the individual blocks and how I modified them to fit my Snape-tastic theme. I should preface all this by stating, for the record, that I'm not a traditionally crazed Snape fangirl. I've never read any fanfiction except the lovely Advent story from Muffin on LJ. I've never cosplayed with anyone Snapey (though, I'm still working on getting my dear hubbie to let me dress him in a frock coat. ;) ) It was just so very weird that the character captivated me. I love to read, but only non-fiction. For some reason, the way Rowling wrote Snape affected me in such a manner that I developed a mild obsession. I've had a grand time imagining the character's motives and backstory. So I put it all into a quilt!

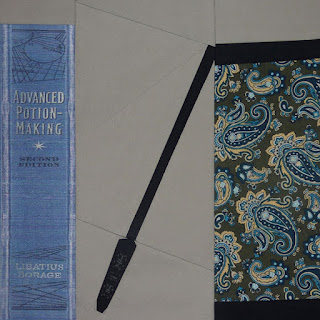
Here is the block from week 2:


The leftmost block is Advanced Potion Making, even though it's illegible with the busy print. Again, these are all books I would have on my bookcase at Spinner's End.

Here's Week 7:


Nothing overtly Snape-ish here, but my Snape reads sonnets. Hey, he wrote the rhyming couplets for the obstacle in The Philosopher's Stone, so why not?

Here is Week 8:


And a detail:


Again, potion-y titles. Also, my Snape trained with a shaman in the Amazon for six months, so he's a talented healer.

Week 11:


I omitted the lovely Hedwig in favour of lace...wing...flies. The potions bottle pattern is from PJ of craftylilthing.


Detail from Week 12:


This is a detail from the book with the lightning bolt. I chose to embroider this title because it was at the end of reading The Half-Blood Prince that I became truly ensnared intrigued by Snape.

Week  14:


I modified the piecing of the wand to reflect the shape of the Professor's. The more legible APM book is printed on inkjet-printable fabric.

Here's a detail of the wand handle, embroidered to resemble the Chinese knot motif on the movie Snape's wand:


Week 28:


This was a block with Trevor. Trevor got swapped for a gold-framed picture of Milltown (now known as Cokeworth thanks to Pottermore). The irony is in the gilding.

Week 29 detail:


Yes, that cauldron says "Property of Potions Master Severus Snape".


I hope if you're a Harry Potter fan and you haven't started - or finished - your PoD yet, you'll give it a go. Whether you're an all-around HP fan or you subscribe to a specific sect of fangirlism, the Project of Doom is an amazing way to express your enthusiasm. If you take the time to make this quilt your own, what you'll end up with is an artwork you will truly treasure.

:)


Friday, April 13, 2012

The Best of Both Worlds

Any Trekkers out there?


Please visit Fandom in Stitches today to download the free paperpieced patterns for 'NCC-1701-D' and 'The Borg'.

These are the second and third blocks I've designed. The Borg block is incredibly easy to piece and the Enterprise is actually quite do-able despite the teeny tiny pieces.

And, naturally, I'm working on embroidery to embellish these a bit. I will share updated patterns as soon as I can get the stitching done!

Thanks to instant streaming on Netflix my infatuation with ST:TNG has been rekindled. I've been spending extra quality time on my treadmill, reabsorbed in my first fandom. I had forgotten how much I love TNG, especially the technical stuff. Ships and space stations? Tricorders and transporters? Yes, please!

Enjoy the patterns, and if you piece them, please do share on the FiS Flickr Group!

Tuesday, April 3, 2012

Garden Gate

Welcome to Joy of Stitches!


I am new to blogging - this is my first post - but a friend suggested I should start blogging my craftiness, so here we are!


Today’s post is about ‘Garden Gate’, the paperpieced block I designed for the Sewhooked April Garden Party Blog Hop.  


This sample is slightly different (in piecing only - not in appearance) than the paper pattern due to pattern improvements. The center archway has been simplified in the printed pattern to use fewer seamlines.


As I'm sure many of my fellow crafters and quilters have done, I've often dreamed of my perfect garden. With this block, I was able to recreate a little of it...if only in fabric and floss! A stone path leads to a gate and trellis overlooking the rolling hills beyond the garden. I populated my garden with some of my best-loved blooms: wisteria, poppies, delphinium, gladiolus, and peonies. The embroidery design is included with the block pattern. Or feel free to plant what you wish in your 'garden'!


I am relatively new to the world of paperpiecing and quilting in general, but I was fortunate enough to be a part of The Project of Doom, Sewhooked owner Jennifer’s Harry Potter Block of the Week quilt. I learned SO much making those thirty blocks. I modified some of Jennifer’s blocks to suit my own devious purposes (more on that in another post...) but ‘Garden Gate’ is the first one I have designed from start to finish. (Actually, Jennifer helped tremendously in helping me finish it, simplifying the piecing from 13 units down to 8!)


I hope you enjoy piecing this pattern, which is very versatile depending on the fabrics you use. I’m thinking about a four-block wall hanging featuring the four seasons.


Customization of this block can be taken even further with embroidery. Needlework is my first passion, and it was a joy to populate my garden in this block.


On to the embroidery tips!


Transferring the design.


Keep in mind the embroidery design included with the pattern is based on the printed pattern. When you transfer your design, you may need to make slight adjustments along the way to compensate for the Real Life block that you sew. Tiny variations in the seams of the block can make a big difference when they accumulate in the final block.


Because of all the seam allowances, light box transfer might be difficult - the layers of fabric are too dense for the light to shine through. I used a combination of two methods to transfer my design - tracing paper and water-soluble marker. 


The tracing paper method is traditionally used for stitching on problematic surfaces, such as velvet or other highly textured fabrics. Tracing paper worked well for the first part of the embroidery on this block. I printed the design on tracing paper and basted it to the block. I then stitched through  both the paper and the fabric and tore away the paper when I was finished. For this project, I only stitched the stem stitch lines through the tracing paper. I’ve found that french knots tend to be loose when stitched through tracing paper.


Unfortunately, I neglected to get a picture of this part of the process, but I do have a shot of the same method on another project:


The black is the fabric, the white is the tracing paper, and the gold is the stem stitch sewn through both paper and fabric.


After stem stitching and removing the tracing paper, I used water soluble marker to freehand the rest of the design, using the printed pattern as reference. You could also use quilter’s transfer paper or dressmaker’s carbon for this step.


Preparing to stitch.


Whenever I have a piece that I’m going to stitch to the very edge, I baste muslin around the edges to give a little extra space for hooping. Here, you can see my basting in red:


The largest hoop I have is a 10”, which happens to be the size of this block. Not ideal. You could use a larger quilting hoop or square frame, one that allows you to see your whole block at once and eliminated the need for re-hooping.


Stitching.


I used variegated floss for most of the blooms. I mixed variegated and solid green for the wisteria vines and french-knot leaves. I used 2 strands on the whole piece. Here are some closeups of the stitching:


Finishing.


If my pieces are washable, I always wash the whole thing when I’m finished stitching. I do this for two reasons: to ensure that I fully remove all traces of water-soluble marker, and to make reshaping of the piece easier. When wet, the block can be reshaped easily into the square it’s supposed to be! Here's my sopping wet block:


To press, place your embroidered block face-down on a fluffy, folded, terry-cloth towel. This will allow the stitches to maintain their dimension while you press.


That’s it for post 1! I would love to hear from you, with any questions or comments about this block or the embroidery. 


Enjoy the rest of the Sewhooked garden party!

Sunday, April 1, 2012

Welcome to Joy of Stitches!

Thank you for visiting my new blog.

Please come back on April 3rd to see my first post, which will go along with Sewhooked's Garden Party Blog Hop.

Paper Pieced Pattern-A-Day Garden Party Blog Hop


See you then!